(Caso interesse, há mais duas postagens sobre papel:
Arte com papel II,
Arte com papel III e
Arte com Papel IV). Também pode interessar Dicas para festas de aniversário
I e
II
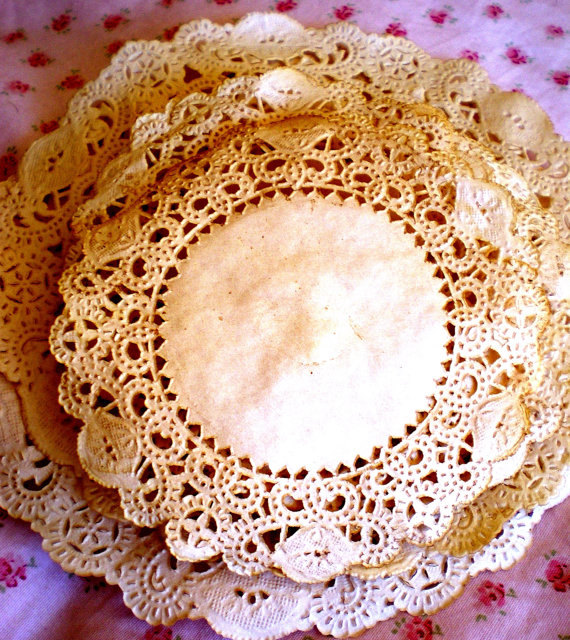
Estou tentando escrever sobre toalhas de papel rendadas (doilies).
Mas há dois dias não consigo porque essa coisa não salva...
Então aqui vão alguns dos sites:
http://www.imagescrap.blogspot.com.br/
http://www.scrapbookbrasil.com/comunidade/showthread.php?14373-papel-rendado/page5
http://www.marthastewart.com/how-to/three-dimensional-doily#slide_1
http://charlottesfancy.com/2010/05/03/crafty-monday-fun-with-dyed-doilies/ (aqui é como colorir as toalhinhas de papel)
http://www.lugardepapel.com.br/blog/369-tutorial-flores-de-doilies.html (tutorial flores)
http://www.scrapbookbrasil.com/comunidade/showthread.php?14373-papel-rendado/page5
http://www.marthastewart.com/how-to/paper-doily-wreath#slide_3
http://fromourhometoyours.blogspot.com.br/2012/02/arte-em-papel-doilies-cupcake-wrappers.html
http://helloveri.blogspot.com.br/2011/10/paper-doily.html
http://coisitasdecasamento.blogspot.com.br/2009_10_01_archive.html
Em inglês são
conhecidos como doilies, em português, acho que é "papel para bandeja"
mesmo, ainda que seja para pires, souplats, pratos. Ou seria papel
rendado? Nem mesmo na embalagem vem o nome desse papelzinho delicado de
muitas utilidades. Então vamos a algumas idéias. Primeiro, uma pra
casamentos, claro!
Cone
de papel rendado, para ser preenchido com pétalas ou arroz, para os
convidados jogarem nos noivos na saída da igreja. Aqui se usou apenas
metade de um papel redondo. Para cones ainda mais estreitos, dá pra usar
ainda menos, ¼ por exemplo, fazendo render mais! O cone não pode se
muito grande, deve conter a porção exata para ser impulsionado para o
alto, sem soltar da mão, uma única vez, e assim todo o seu conteúdo se
esvairá pelos ares. Por isso tem que ter pouco arroz/pétalas em cada um.
A vantagem do cone é que o convidado não precisa colocar as mãos nas
pétalas/grãos de arroz, e ficará mais propenso a não jogar na cara dos
noivos, e sim para cima... será? Mas de qualquer jeito, vale pela
delicadeza e singeleza...
Agora para decoração de um chá de panela, aniversário, ou outros eventos...
Móbile
de papel para pires, pendurado com linha de nylon (já fiz desses
móbiles com tapetinho pra bombom, que é bem mais leve. Não ficou tão bom
quanto, mas com certeza, mais barato):
Flor
com 3 papéis redondos de tamanhos variáveis. Arrematando com um botão,
pingente, broche, ou qualquer outra coisinha, fica uma decoração e
tanto:
 Papel quadrado, dobrado para formar um envelope:
 Convites
com recortes de papel em forma de vestidinho (quem sabe a capa de um
livrinho de recados ou de receitas para dar para as madrinhas?):
Convites
com recortes de papel em forma de vestidinho (quem sabe a capa de um
livrinho de recados ou de receitas para dar para as madrinhas?):
Guirlandas:
Para
algo mais duradouro, aqui eles foram utilizados em decoupàge, para um
bule e latas redondas para mantimentos. Esse papel verde é um enigma, só
vejo branco pra vender!

http://charlottesfancy.com/2010/05/03/crafty-monday-fun-with-dyed-doilies/
Supplies:
- A bowl or baking dish (I used a Pyrex baking dish)
- White doilies
- Food coloring
- Paper towels
- Rubber gloves
You like coloring Easter eggs, right? Dipping the egg in the dye and
delighting in the color when you take them out of the cup? Same thing
here with the doilies.
- Fill the baking pan or bowl with only enough water to cover the
doilies – this is key, because you need the food coloring to be very
concentrated. You will need to use quite a lot of food coloring. My
first two or three attempts were failures (I had too much water in my
dish and not enough food coloring). After I dumped out most of the
water, and really poured in a lot of dye, it worked nicely.
- Submerge the doily in the dish/bowl for a few seconds (10 or 15
seconds is sufficient). I started to get bolder toward the end of this
craft and I left them in for longer, just to see.
- Gently take them out of the dish and lay them on a paper towel to
dry. They are very fragile, so use caution when you take them out of the
pan.
- Blot them dry right away with another paper towel very gently. Set
aside to dry. (I laid mine out on a table, underneath a ceiling fan, and
they dried very quickly).
If you don’t want your fingers to turn green or blue or purple, like
mine did, use rubber gloves to take the doilies out of the dye. Also,
this craft is a paper towel hog; you will want to have lots of paper
towels handy.
This is definitely a kid friendly activity, except it might take kids
(depending on how old they are) a couple of tries to get the doily out
of the dye without tearing it. Elena and Rosa had no trouble; their
favorite part was telling me which color to make next.
These are (predictably) SO addictive to make, and it’s why I now have a zillion colorful doilies.
Who wants some?
http://www.scrapbookbrasil.com/comunidade/showthread.php?14373-papel-rendado/page5
http://www.marthastewart.com

Step 1
Working on a covered surface, lay a 24-inch wreath form inside a
30-inch one. Attach them with 24-gauge wire at 6 to 8 evenly spaced
points.
Step 2
In a ventilated area, coat combined wreath form with white spray paint. Let dry.
Step 3
Wrap wreath form with a 20-foot strand of white holiday lights (test
lights beforehand), leaving the plug end unwrapped (as much as is needed
to plug in).
Step 4
With scissors, widen the center-hole slits slightly in paper bouquet
holders (we used 10 8.8-inch ones, 20 6.4-inch ones, 20 4.8-inch ones,
and 50 3.2-inch ones). Poke a finger through center hole of each bouquet
holder (from front to back) to create openings large enough to
accommodate a lightbulb.
Step 5
Beginning with largest ones, place bouquet holders evenly around
wreath, slipping a light through each hole so that bulb bases, not
bulbs, rest against paper. (From time to time, hang wreath, and step
back to ensure that the arrangement is balanced and attractive.)
Step 6
Add remaining bouquet holders in descending size order. Use smallest
bouquet holders to cover centers of larger ones and to fill in any gaps.
Hang near an outlet. Unplug when unattended.
Read more at Marthastewart.com:
Paper-Doily Wreath - Martha Stewart Crafts
/how-to/paper-doily-wreath#slide_3
http://fromourhometoyours.blogspot.com.br/2012/02/arte-em-papel-doilies-cupcake-wrappers.html
http://www.blogger-index.com/feed178850.html
Aprenda a fazer o envelope de doilies (http://welovelaughkiss.wordpress.com/2009/09/02/she-says-do-it-myself-dim-lace-paper-envelope/)
Materials :
- 9 inch square doilies
- Vellum/tracing paper
- Craft Adhesive Spray
- Art Card
- Cutter/double-sided tape/cutting mat/ ruler
1. Create a template for the tracing paper/vellum. I used my old drawing block as the template. After a few attempts to get the right template, I am satisfied with my crisp looking template!
2. Trace the template into the tracing paper and use cutter to cut it. But for the folded side in the middle, use the blunt edge of the cutter to give a folding mark.
3. Spray the tracing paper with the Adhesive Spray. Don’t forget to put newspaper to cover the surrounding area. Leave it for 15 secs. Carefully stick it to the doilies, make sure it fits perfectly.
4. Fold the doilies to follow the tracing paper’s structure. Secure the inside of the envelope with double-sided tape. Voila! Beautifully hand-crafted envelope.
Yup! I am going to make a hundred pieces of this. Ambitious as it may sound, I still have 6 months in the making and my wonderful artist/designer friends to my aid. So, to all our beloved guests, this is just for you!